Declarative Infrastructure and Application Releases
Tony Messias
Containers have been in the hype for quite some time now and Orchestrators have enabled us to shift the way we deploy software from task runners to something more declarative way. In this article, we are exploring that and going a bit further by also setting up our infrastructure in a declarative way using HashiCorp's Terraform.
Requirements
You will need some tools installed, make sure you have them on your local machine:Docker
- Kubernetes' kubectl
- Digital Ocean's doctl
- A Digital Ocean account
Containerizing a PHP Application
First of all, we are going to start from scratch here, so let's create the folder that will wrap all of our files:
mkdir php-terraform-kubernetes-example/Great! From now on, we are calling this folder the root path.
Now, let's create the World's simplest PHP application. Add an index.php file under
<html lang="en"> <head> <title>Simplest PHP APP</title> </head> <body> <h1>Hello, World!</h1> <h3>From host: <?= gethostname(); ?></h3> </body></html>Since having PHP installed wasn't a requirement, we are going to use Docker to test this application. For that, let's create the World's worst PHP Dockerfile. Create a Dockerfile inside <root>/app/ with the following content:
FROM php:7.3 WORKDIR /app COPY . /app CMD ["php", "-S", "0.0.0.0:80", "-t", "public/"]This Dockerfile describes how we want our Docker image to look like. It contains all the steps to create (and recreate) the Docker image for our containers. Let's dissect the lines instructions on it:
- FROM php:7.3: This tells Docker that our application Docker image is based on the official PHP image for the 7.3 version. Official images do not require an organization/username prefix and can be found in the default Docker Registry - Docker Hub;
- WORKDIR /app: This sets the path /app inside our container as the working directory, which means that any command running inside the container will from this directory as context;
- COPY . /app: This copies all files from the context path to the /app path inside the container;
- CMD ...: This is the default command that the container will run. We can override this at runtime, but that's out of the scope of this article.
Alright, with that covered, let's build our custom Docker image by running the following command:
docker build -t tonysm/demo-php-app:0.0.1 -f app/Dockerfile ./appSending build context to Docker daemon 3.584kBStep 1/4 : FROM php:7.3 ---> f0357c41bff5Step 2/4 : WORKDIR /app ---> Using cache ---> fac311810559Step 3/4 : COPY . /app ---> Using cache ---> 88f78910921eStep 4/4 : CMD ["php", "-S", "0.0.0.0:80", "-t", "public/"] ---> Using cache ---> 1165b21c4c06Successfully built 1165b21c4c06Successfully tagged tonysm/terraform-k8s-demo-app:0.0.1Here's a poor explanation of what is going on here:

Great. Our image was successfully built. You can find your Docker image in your local images with the following command:
docker image ls | grep tonysm/terraformtonysm/terraform-k8s-demo-app 0.0.1 e522d9fbc93b 5 seconds ago 367MBNice, let's run this image locally to test it out:
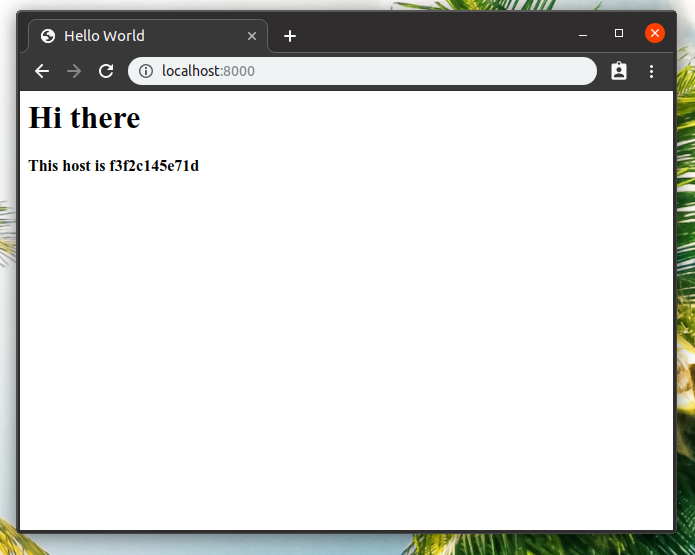
docker run -p 8000:80 tonysm/terraform-k8s-demo-app:0.0.1No output, which (in this case) means it's working. Open http://localhost:8000 in your browser and you should see something like this:
Great! Now, let's push this image to Docker Hub. You need to create an account there, so go ahead, I'll wait.
Now that you have an account in Docker Hub, you also need to authenticate you local Docker CLI running docker login and typing your credentials there. After that, we can now push our image to Docker Hub with:
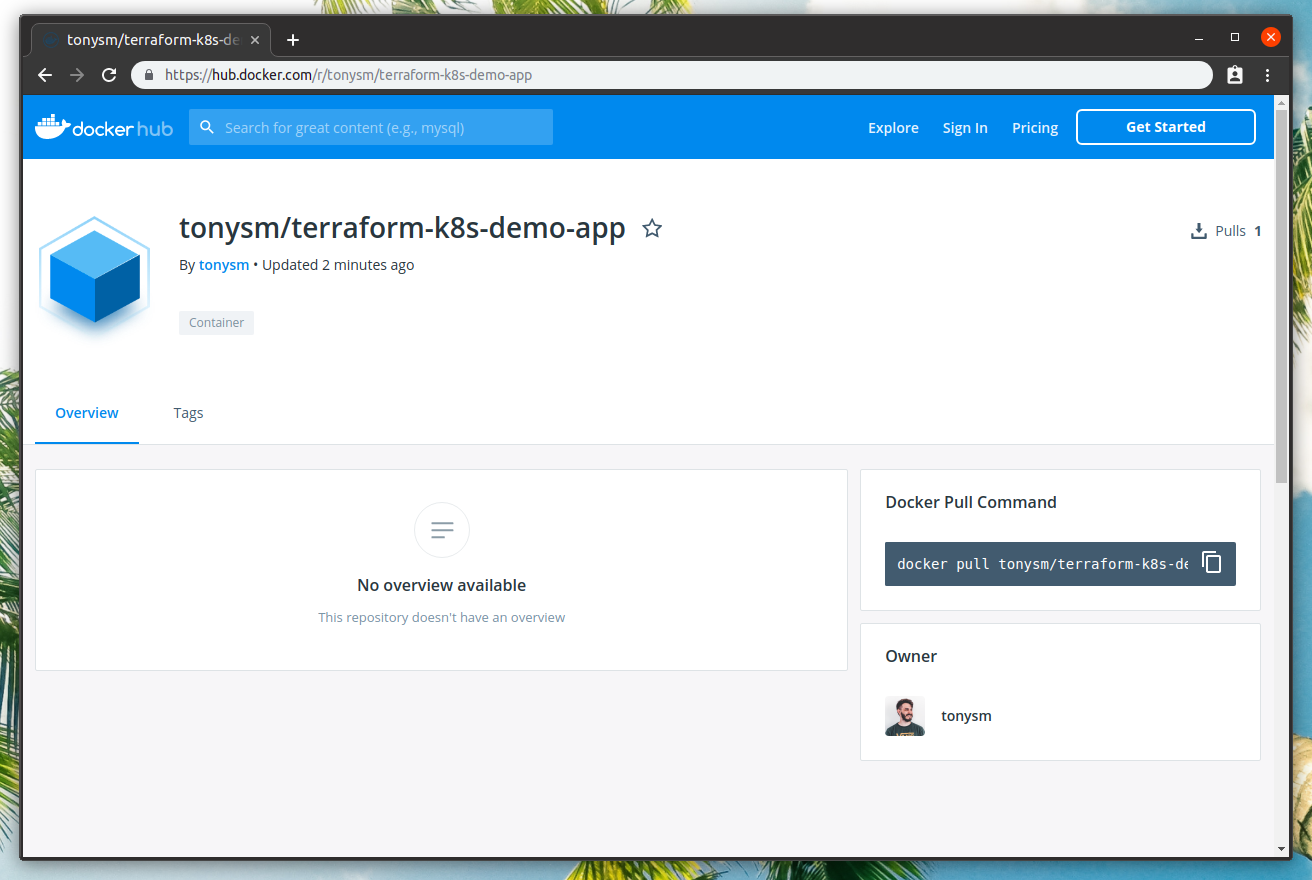
docker push tonysm/terraform-k8s-demo-app:0.0.1The push refers to repository [docker.io/tonysm/terraform-k8s-demo-app]0e017f123496: Pushed5bcce6289196: Pushed5e63a0adbe83: Mounted from tonysm/dummy-php-image82c280d40dc6: Mounted from tonysm/dummy-php-image07886e8b1870: Mounted from tonysm/dummy-php-imagee01f9f2bc3a7: Mounted from tonysm/dummy-php-image4625f667b473: Mounted from tonysm/dummy-php-image0318b3b010ef: Mounted from tonysm/dummy-php-imaged7b30b215a88: Mounted from tonysm/dummy-php-image9717e52dd7bd: Mounted from tonysm/dummy-php-imagecf5b3c6798f7: Mounted from tonysm/dummy-php-image0.0.1: digest: sha256:27f939f99c2d57ca690a5afdc8de2afe0552b851d0c38213603addd1f6bba323 size: 2616In my case, some of the steps were already present in another image in my user account, so Docker knows that and doesn't have to push the same layers again. If you open your profile on Docker Hub, the image will be there, publicly available to anyone:
Great. Now, let's create our Kubernetes Cluster.
Terraforming Infrastructure on DigitalOcean
Since we are using DigitalOcean, we could go to their Dashboard and spin up a Kubernetes Cluster from there. But, let's make it more interesting by using Terraform to do that for us. It will build the Kubernetes Cluster for us and later we can deploy our application to it.
Let's start by creating the folder <root>/provision/ in our app (mkdir provision/). Terraform doesn't require any file naming convention, it will load any file ending with *.tf in our folder, so let's create a main.tf file with the following content:
provider "digitalocean" { token = var.do-token} // Kubernetes cluster with 3 nodes.resource "digitalocean_kubernetes_cluster" "terraform-k8s-demo-app" { name = "terraform-k8s-demo-app" region = "nyc1" version = "1.14.2-do.0" node_pool { name = "terraform-k8s-demo-app-pool" size = "s-2vcpu-2gb" node_count = 1 }I'm not going over line-by-line on what is going on here, just know that we are telling Terraform that we are using the digitalocean provider, and that gives us some resource types we can use, one of them is the digitalocean_kubernetes_cluster that creates the cluster for us with, in this case, 1 node (see the node_count definition). If you want to learn more, the documentation is a wonderful place.
This file requires the existence of a variable, the var.do-token, let's create a variables.tf file:
variable "do-token" { default = "(YOUR DIGITAL OCEAN TOKEN)"}Make sure this file is ignored on Git, you do not want to share your Digital Ocean token. Now, let's initialize our Terraform client:
cd provision/terraform init Initializing the backend... Initializing provider plugins... The following providers do not have any version constraints in configuration,so the latest version was installed. To prevent automatic upgrades to new major versions that may contain breakingchanges, it is recommended to add version = "..." constraints to thecorresponding provider blocks in configuration, with the constraint stringssuggested below. * provider.digitalocean: version = "~> 1.4" Terraform has been successfully initialized! You may now begin working with Terraform. Try running "terraform plan" to seeany changes that are required for your infrastructure. All Terraform commandsshould now work. If you ever set or change modules or backend configuration for Terraform,rerun this command to reinitialize your working directory. If you forget, othercommands will detect it and remind you to do so if necessary.Great. Now, let's use Terraform to make a plan of action to build the infrastructure:
terraform plan -out /tmp/plan Refreshing Terraform state in-memory prior to plan...The refreshed state will be used to calculate this plan, but will not bepersisted to local or remote state storage. section: content ------------------------------------------------------------------------ An execution plan has been generated and is shown below.Resource actions are indicated with the following symbols: + create Terraform will perform the following actions: # digitalocean_kubernetes_cluster.terraform-k8s-demo-app will be created + resource "digitalocean_kubernetes_cluster" "terraform-k8s-demo-app" { + cluster_subnet = (known after apply) + created_at = (known after apply) + endpoint = (known after apply) + id = (known after apply) + ipv4_address = (known after apply) + kube_config = (known after apply) + name = "terraform-k8s-demo-app" + region = "nyc1" + service_subnet = (known after apply) + status = (known after apply) + updated_at = (known after apply) + version = "1.14.2-do.0" + node_pool { + id = (known after apply) + name = "terraform-k8s-demo-app-pool" + node_count = 1 + nodes = (known after apply) + size = "s-2vcpu-2gb" } } Plan: 1 to add, 0 to change, 0 to destroy.section: content ------------------------------------------------------------------------ This plan was saved to: /tmp/plan To perform exactly these actions, run the following command to apply: terraform apply "/tmp/plan"Terraform gives us what it plans to do in our infrastructure. It's our job to validate if everything looks ok. For this example, I think it's fine, let's apply this plan:
terraform apply /tmp/plandigitalocean_kubernetes_cluster.terraform-k8s-demo-app: Creating...digitalocean_kubernetes_cluster.terraform-k8s-demo-app: Still creating... [10s elapsed]digitalocean_kubernetes_cluster.terraform-k8s-demo-app: Still creating... [20s elapsed]digitalocean_kubernetes_cluster.terraform-k8s-demo-app: Still creating... [30s elapsed]digitalocean_kubernetes_cluster.terraform-k8s-demo-app: Still creating... [40s elapsed]digitalocean_kubernetes_cluster.terraform-k8s-demo-app: Still creating... [50s elapsed]digitalocean_kubernetes_cluster.terraform-k8s-demo-app: Still creating... [1m0s elapsed]digitalocean_kubernetes_cluster.terraform-k8s-demo-app: Still creating... [1m10s elapsed]digitalocean_kubernetes_cluster.terraform-k8s-demo-app: Still creating... [1m20s elapsed]digitalocean_kubernetes_cluster.terraform-k8s-demo-app: Still creating... [1m30s elapsed]digitalocean_kubernetes_cluster.terraform-k8s-demo-app: Still creating... [1m40s elapsed]digitalocean_kubernetes_cluster.terraform-k8s-demo-app: Still creating... [1m50s elapsed]digitalocean_kubernetes_cluster.terraform-k8s-demo-app: Still creating... [2m0s elapsed]digitalocean_kubernetes_cluster.terraform-k8s-demo-app: Still creating... [2m10s elapsed]digitalocean_kubernetes_cluster.terraform-k8s-demo-app: Still creating... [2m20s elapsed]digitalocean_kubernetes_cluster.terraform-k8s-demo-app: Still creating... [2m30s elapsed]digitalocean_kubernetes_cluster.terraform-k8s-demo-app: Still creating... [2m40s elapsed]digitalocean_kubernetes_cluster.terraform-k8s-demo-app: Still creating... [2m50s elapsed]digitalocean_kubernetes_cluster.terraform-k8s-demo-app: Still creating... [3m0s elapsed]digitalocean_kubernetes_cluster.terraform-k8s-demo-app: Still creating... [3m10s elapsed]digitalocean_kubernetes_cluster.terraform-k8s-demo-app: Still creating... [3m20s elapsed]digitalocean_kubernetes_cluster.terraform-k8s-demo-app: Still creating... [3m30s elapsed]digitalocean_kubernetes_cluster.terraform-k8s-demo-app: Still creating... [3m40s elapsed]digitalocean_kubernetes_cluster.terraform-k8s-demo-app: Still creating... [3m50s elapsed]digitalocean_kubernetes_cluster.terraform-k8s-demo-app: Still creating... [4m0s elapsed]digitalocean_kubernetes_cluster.terraform-k8s-demo-app: Still creating... [4m10s elapsed]digitalocean_kubernetes_cluster.terraform-k8s-demo-app: Still creating... [4m20s elapsed]digitalocean_kubernetes_cluster.terraform-k8s-demo-app: Still creating... [4m30s elapsed]digitalocean_kubernetes_cluster.terraform-k8s-demo-app: Still creating... [4m40s elapsed]digitalocean_kubernetes_cluster.terraform-k8s-demo-app: Creation complete after 4m44s [id=81ee8486-51cb-48da-811c-14d6b3346f7d] Apply complete! Resources: 1 added, 0 changed, 0 destroyed. The state of your infrastructure has been saved to the pathbelow. This state is required to modify and destroy yourinfrastructure, so keep it safe. To inspect the complete stateuse the `terraform show` command. State path: terraform.tfstateGreat. This means our Kubernetes cluster was successfully created on Digital Ocean. You can open up your Dashboard and see the cluster as well as the nodes, but let's use the doctl CLI tool for that. To start, you need to authenticate with your Digital Ocean token:
doctl auth initAnd paste your Digital Ocean token. Now, let's list our Kubernetes:
doctl kubernetes cluster listID Name Region Version Auto Upgrade Status Node Pools81ee8486-51cb-48da-811c-14d6b3346f7d terraform-k8s-demo-app nyc1 1.14.2-do.0 false running terraform-k8s-demo-app-poolNice. Let's connect our local kubectl to that remote cluster:
doctl kubernetes cluster kubeconfig save 81ee8486-51cb-48da-811c-14d6b3346f7dNotice: adding cluster credentials to kubeconfig file found in "/home/tony/.kube/config"Notice: setting current-context to do-nyc1-terraform-k8s-demo-appFrom now on we are doing any command we run with kubectl in our cluster, like:
kubectl cluster-infoKubernetes master is running at https://81ee8486-51cb-48da-811c-14d6b3346f7d.k8s.ondigitalocean.comCoreDNS is running at https://81ee8486-51cb-48da-811c-14d6b3346f7d.k8s.ondigitalocean.com/api/v1/namespaces/kube-system/services/kube-dns:dns/proxy To further debug and diagnose cluster problems, use 'kubectl cluster-info dump'.Cool. Now, let's deploy our application on this Kubernetes Cluster.
Deploying on Kubernetes
We already have our image on Docker Hub (our registry), so we only have to create our Kubernetes Objects' manifests. If you are new to Kubernetes, I did an attempt to explain what these are in this blogpost, but also check the docs.
For our application, we will need:
- A deployment object for the web (our application);
- A service object to represent load balance requests to our webapp PODs.
Now, create the folder <root>/k8s/, there you can create the file webapp.yml with the following contents:
apiVersion: apps/v1kind: Deploymentmetadata: labels: app: webapp-web name: webapp-web-deploymentspec: replicas: 2 selector: matchLabels: app: webapp-web template: metadata: labels: app: webapp-web spec: containers: - image: tonysm/terraform-k8s-demo-app:0.0.1 name: webapp-web-deployment ports: - containerPort: 80 name: httpsection: content ---apiVersion: v1kind: Servicemetadata: name: webappspec: type: LoadBalancer ports: - port: 80 targetPort: http selector: app: webapp-webLet's take the time to talk about what we have here. This file contains 2 Kubernetes Objects separated by the triple dashes (---). The first one is a Deployment Object. This is typically the type of object you use on your applications. With this kind of object, Kubernetes handles the rollout of new images (you can control the deploy strategy, but by default, it is RollingUpdate, which will terminate existing PODs while creating the new ones whenever you apply a new image. The important pieces are:
- .spec.replicas: 2: tells we want 2 PODs running;
- .spec.selector.matchLabels.app: webapp-web: is what this deployment will use to "watch" how many PODs are running, so Kubernetes can control the desired amount of PODs for us;
- .spec.template: is the template that will be used to create the PODs. You can think of it as a POD object definition (I'm not sure if they call it that, but it's easier for me to think like that);
- .spec.template.metadata.labels.app: webapp-web: is very important! This is what the deployment uses in the matchLabels defition above. The deployment uses the label in this template to match with the selector to make sure it has the desired amount of running PODs for this deployment in our Cluster. This is also used when we scale down or up our PODs;
- .spec.template.spec.containers[0].image: tonysm/terraform-k8s-demo-app:0.0.1: is the container image used by this POD (technically we can have more than one container for a single POD, but that's rarely needed, tbh);
- .spec.template.spec.containers[0].ports[0].containerPort: 80: is the port this container is expecting requests;
- .spec.template.spec.containers[0].ports[0].name: http: is an alias for this port, we are using it later to reference this port instead of the number.
Alright, let's cover the service portion now. Services in Kubernetes are load-balancers that can be used to distribute load for our containers. They serve as a central reference for the PODs under it. For instance, if you have another application that talks to this application, you wouldn't have to point it to a POD. Actually, since PODs are ephemeral (like containers), this would be hard to manage. You can, however, point that application to the service instead, and the service would be responsible to send the request to the correct POD. Important pieces here are:
- .spec.ports[0].port: 80: this is the port the service is expecting requests on;
- .spec.ports[0].targetPort: http: this is the named port in our POD container the service will be sending these requests to (remember we named the container port in the Deployment template? That one);
- .spec.selector.app: webapp-web: this is the label used by the service to identify the PODs that are behind it.
There is one more caveat here. When you use a service of type LoadBalancer in the DigitalOcean Kubernetes cluster, DigitalOcean will assign an actual LoadBalancer (Ingress) that points to your service. This way, you will get a public IP bound to this service that you can use in your DNS config.
Enough talking, let's apply this object to our cluster:
kubectl apply -f k8s/deployment.apps/webapp-web-deployment createdservice/webapp createdGreat. Everything seems to be working. Let's wait a bit, because the service takes some time to create the LB for us. You can get the public IP either in the DigitalOcean dashboard or via CLI:
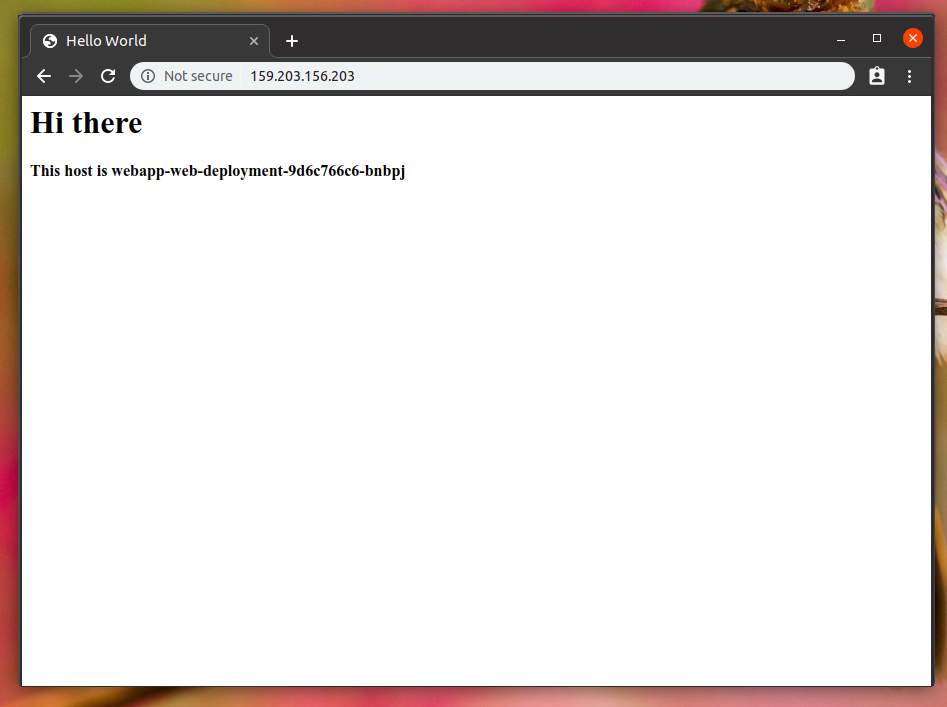
kubectl get svc -wNAME TYPE CLUSTER-IP EXTERNAL-IP PORT(S) AGEkubernetes ClusterIP 10.245.0.1 <none> 443/TCP 7m55swebapp LoadBalancer 10.245.144.120 <pending> 80:30808/TCP 10swebapp LoadBalancer 10.245.144.120 159.203.156.203 80:30808/TCP 28mNow, if you open 159.203.156.203 on your browser, you should see our application running on DigitalOcean!
If you refresh, you can see the hostname changed!
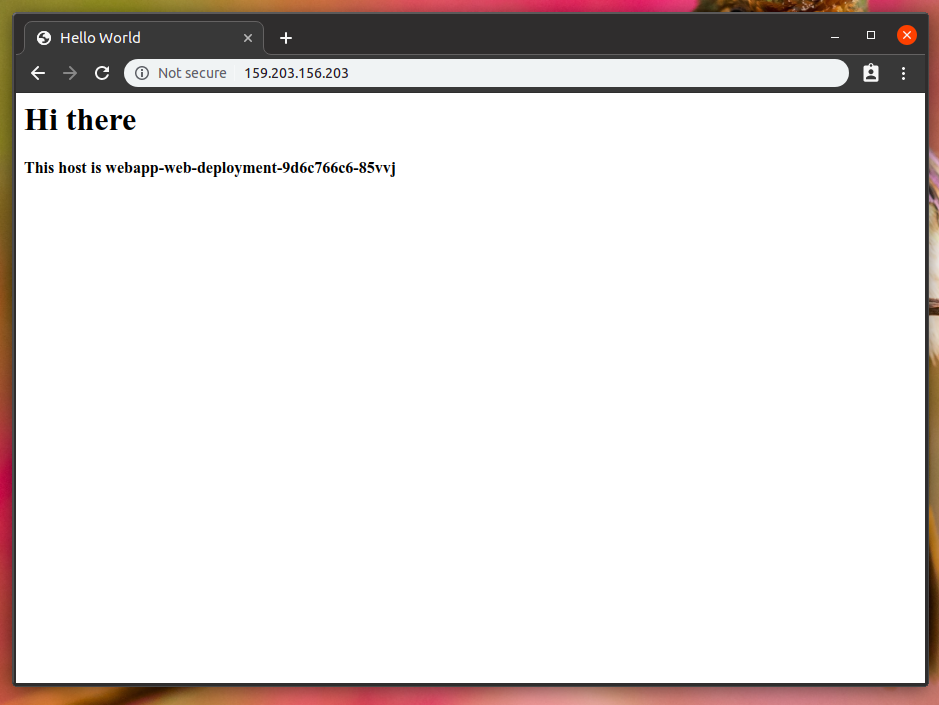
This is because we have 2 replicas of the POD running in the cluster, as you can see with the following command:
kubectl get podsNAME READY STATUS RESTARTS AGEwebapp-web-deployment-9d6c766c6-85vvj 1/1 Running 0 32mwebapp-web-deployment-9d6c766c6-bnbpj 1/1 Running 0 32mPretty cool, right?!
Cleaning up
You probably don't want to keep this running on your DigitalOcean account, so let's clean up. First of all, let's delete the things we create via Kubernetes:
kubectl delete -f k8s/deployment.apps "webapp-web-deployment" deletedservice "webapp" deletedAlright, this should get rid of our PODs, deployments, replica sets, services, and, more importantly, our LoadBalancer that was assigned to the running service.
Next, let's use terraform to delete the Kubernetes cluster and running nodes for us:
cd provision/terraform destroy...Plan: 0 to add, 0 to change, 1 to destroy. Do you really want to destroy all resources? Terraform will destroy all your managed infrastructure, as shown above. There is no undo. Only 'yes' will be accepted to confirm. Enter a value: yes digitalocean_kubernetes_cluster.terraform-k8s-demo-app: Destroying... [id=37b9cb67-d8cc-468d-a017-2102c2d87246]digitalocean_kubernetes_cluster.terraform-k8s-demo-app: Destruction complete after 1s Destroy complete! Resources: 1 destroyed.Everything was erased (it might take a few seconds for things to disappear from your Digital Ocean dashboard).
Wrapping up
Alright, that was a long ride. After all this, this should be your current file structure:
tree ..├── app│ ├── Dockerfile│ └── public│ └── index.php├── k8s│ └── web.yml└── provision ├── main.tf ├── terraform.tfstate ├── terraform.tfstate.backup └── variables.tf 3 directories, 7 filesThe terraform.tfstate inside the provision/ folder is where terraform keeps your infrastructure state (ips, resources creates, things like that). When you are working on a team, you probably want that state not on your local machine, but living somewhere where your teammates can also use to manage the cluster. That can be achieved by using a share S3 bucket in your backend. If you are using Digital Ocean, they have a service called Spaces, which can also be used instead of AWS S3, as they implement the same protocols.
That's it for now, I hope I have sparked some interest to you on the topic. This declarative way of doing things is becoming way more common these days, and it's everywhere: on your frontend (React and Vue), as well as in your infrastructure.
This also enables a thing we are going to talk about next: GitOps.
See you soon!